
| Wig Care | |
| Can human hair wigs be dyed? | |
| Yes, human hair wigs can be dyed. You can use the same hair dye, the same developer, and even the same tools to dye your wig as you would natural hair. However, there are a few things to keep in mind when dyeing a human hair wig: 1. Choose the right dye. Not all hair dyes are created equal. Some dyes are specifically designed for human hair, while others are designed for synthetic hair. It is important to use a dye that is designed for human hair, as synthetic dyes can damage human hair wigs. 2. Use the right developer. The developer is the chemical that activates the dye and causes it to color the hair. The developer comes in different strengths, and the strength of the developer will affect the final color of the wig. It is important to use a developer that is the same strength as the dye you are using. 3. Apply the dye evenly. It is important to apply the dye evenly to the entire wig. This will help to ensure that the color is consistent throughout the wig. 4. Process the dye for the recommended amount of time. The processing time will vary depending on the dye you are using. It is important to process the dye for the recommended amount of time to ensure that the color is fully developed. 5. Rinse the wig thoroughly. Once the dye has been processed for the recommended amount of time, it is important to rinse the wig thoroughly with cold water. This will help to remove any excess dye from the wig. 6. Style the wig as desired. Once the wig is dry, you can style it as desired. Here are some additional tips for dyeing a human hair wig: 1. Test the dye on a small piece of the wig first. This will help you to see how the dye will look on the wig and to make sure that it does not damage the hair. 2. Wear gloves to protect your hands from the dye. 3. Work in a well-ventilated area. The fumes from the dye can be strong. 4. Be patient. It may take a few tries to get the desired color. With a little care and attention, you can easily dye your human hair wig to any color you desire. |
|
| What's Wigs and Hair Piece Tapes | |
| Wig and hairpiece tapes are adhesive tapes that are used to secure wigs and hairpieces to the scalp. They are typically made of a strong, flexible material that is water-resistant and latex-free. Wig and hairpiece tapes come in a variety of sizes, shapes, and strengths, so you can find the perfect one for your needs. Here are some of the most common types of wig and hairpiece tapes: 1. Double-sided tape: This type of tape has adhesive on both sides, so it can be used to secure a wig or hairpiece to the scalp from both the front and back. 2. Contour tape: This type of tape is pre-cut to fit the contours of the scalp, making it a more secure option than regular double-sided tape. 3. Strip tape: This type of tape comes in long, narrow strips that can be cut to the desired length. It is a good option for people who want a more flexible and adjustable attachment method. 4. Tabs: These are small, adhesive tabs that can be applied to the scalp and then used to secure a wig or hairpiece. They are a good option for people who want a more discreet attachment method. Wig and hairpiece tapes are a safe and effective way to secure wigs and hairpieces to the scalp. They are easy to use and can be removed without damaging the hair or scalp. Here are some tips for using wig and hairpiece tapes: 1. Clean the scalp with soap and water before applying the tape. 2. Apply the tape in a smooth, even layer. 3. Press the tape firmly into place. 4. Allow the tape to dry completely before wearing the wig or hairpiece. Wig and hairpiece tapes can last for several days, depending on the type of tape and how often you wear the wig or hairpiece. When the tape starts to lose its adhesiveness, you can remove it and reapply it. If you have any questions about wig and hairpiece tapes, you should consult with a professional wig stylist. They can help you choose the right type of tape for your needs and show you how to apply it correctly. |
|
| A Full Lace Front Install in 5 Steps Using Walker Signature Tape | |
| This blog post features an example product line you can use when doing a full lace front install with a Maximum Wear tape. But before jumping in, wed like to briefly outline why our suggested method requires your client to have at least two hair systems.
First off, we recommend having two systems because it ups your chances of keeping clients loyal to your business. While they wear one system, you can store and prepare the other system before the next appointment. Your clients will appreciate you for storing their system, which keeps it safe from accidents were they to keep it at their home. Also, your clients will rave about how smooth your appointments are with the two-system approach. Youll have them in and out faster and happier than ever, offering them a more comfortable experience in your salon. Plus, it actually extends the life of both systems. Instead of constantly being worked with and exposed to product, one system can be stored in peace. This gives it time away from the wear and tear of being handled. And with two systems, you can allow them to air dry, avoiding the damage caused by blow dryers altogether. Step 1: Prep Clients Stored Hair System Before Appointment 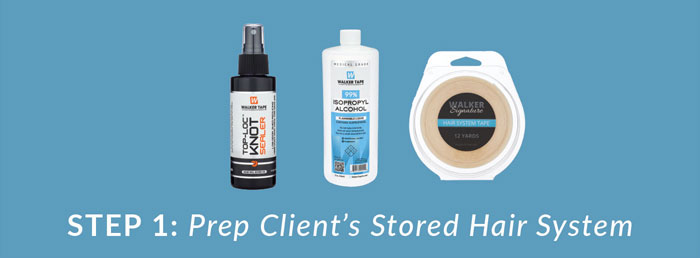 Step 2: Remove Clients Current Hair System 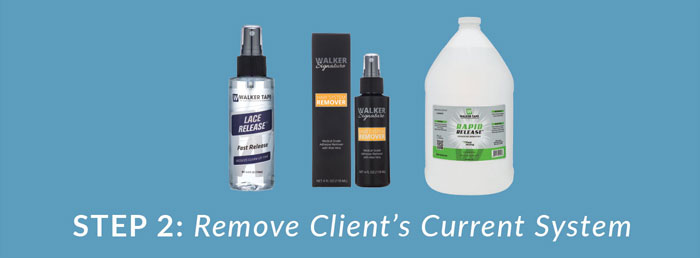 Step 3: Prep Clients Scalp for Reinstall 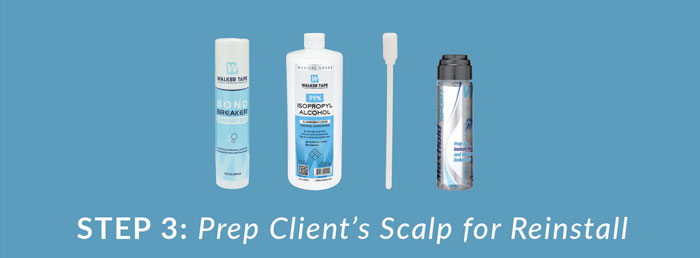 99% Alcohol: Step 4: Install Clients Stored System  Step 5: Clean Clients Removed System After Appointment   |
|
| Great hair days are in your hands? | |
| CONTENTS * Instructions for Wig Cleaning and Conditioning
* Proper Handling * How to Choose a Style? * How to Find Size You Need * How Do I Put On Wig * Basic Part of a Wig * Caution! * Use a Blow Dryers * Guide for First Time Wearers * Care and Styling Wigs * Pre-Designed Wigs, Pre-Made and Stock Items * Do I need a Wig Cap? Instructions for Wig Cleaning and Conditioning Step 1: Brush the wig thoroughly Step 2: Add wig shampoo to wash basin and fill with cold water. Step 3: Let soak for 5 minutes. Step 4: Swish the wig gently NEVER RUB Step 5: Rinse gently in cold clear water twice or until thoroughly rinsed Step 6: Apply generous amount of wig conditioner and gently work through hair with fingertips Step 7: Rinse thoroughly with cold water Step 8: Drain and blot gently with towel DO NOT SQUEEZE or WRING Step 9: Allow to air dry on a wire wig stand or a slender object like a can of hair spray DO NOT USE Step 10: Brush wig only when completely dry (remember: one direction) Proper Handling COLD SET Unwanted curls or creases (cold set) occur to a wig (or hair piece) when it is stored in tight packaging. To remove cold set, spray water generously on the affected area and wait for a few moments. Brush gently to remove cold set and let wig completely dry. Excessive cold set problems can occur to human hair. For human hair wigs follow above instruction or use hot roller or iron at low to medium heat setting. This will help you to bring out the original beauty of a wig. FIXING TANGLED HAIR Due to excessive combing and/or rubbing on clothing, tips of hair tend to tangle. Spray water generously on affected area. Start brushing tips of hair first taking longer lengths of hair with each stroke to untangle. Spray curling gel and wrap with curling paper before putting on rollers to restore the original curls. For human hair wigs, curling iron or rollers at low to medium heat may be used along with a setting lotion. DISPLAY Most wigs do not need extra styling when taken out of package. Simply give a light shake and touch up with fingers, this will bring out the salon perfect style as is shown in our Website. Do not use brush or comb nor shake special curl wigs to bring out curls. Use fingers or picks to lift and shape curls. Do not apply hair spray on displayed wigs. Use tall mannequin or increase the height of the mannequin so that ends of long hair do not rest on shelf. STORAGE Never remove protective packaging materials to save space, or store in a high humidity and/or hot space. Do not force a wig into small space. Avoid stacking wigs high. Such storage may cause serious cold set damages. Once taken out of packaging, restore curls and fold wig as when it first came out of package before putting it back into package for storage. To maximize your customers satisfaction and your profit, allow adequate storage space for wigs.How to Choose a Style? back to top Pick a style that you are comfortable with. If you have large features don't select a shorter style. The Perfection is an excellent style for beginners because it is easy to work with and tends to feminize masculine features. The Angel is great if you like it long. How to Find Size You Need? Today's wigs all have adjustable caps to fit most heads. Size is seldom a problem unless your temple circumference exceeds 22". If it does the cap can be stretched another 1-2". *Vary by styles and manufactures. Basic Part of a Wig 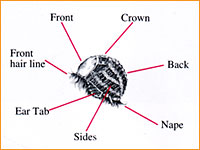 * CAP - The base or skeleton that gives the wig its shape and a base to attach hair to. Depending on the openness of the cap, a wig is called a; * REGULAR CAP - There are no open areas in the cap material. * CAPLESS- 20% - 75% of the cap is open, which makes the cap lighter, cooler, and more elastic for a comfortable fit. * FULL CAPLESS - More than 90% of the cap is open, for the ultimate comfort in wearing. * WEFTS - Stands of hair fibers are sewn together at one end to make a curtain of hair. These wefts are sewn onto the cap to simulate natural hair. How Do I Styling Wig? Your wig can be styled by using a wire brush, a wire pick, or your fingertips. Your wig was designed with a basic style but the variations you can achieve through styling are limitless. Added height can be achieved by gently lifting with the brush. If you want added fullness as well, tease or back comb and then smooth the surface hair over the teasing. To return your wig to its basic style simply brush thoroughly, clean and allow to air dry. Caution! * Expose to heat in excess of 160?(Like opening an oven door) * Brush your wig when wet. * Use a curling iron or blow dryer. Use products other than wig care products (CAUTION!) A synthetic wig is made of fine plastic filaments. Excessive heat will damage it. Use caution around oven doors, fireplaces, wall heaters, barbecues, and other uncontrolled high heat sources. The heat will melt the fiber and cause it to look frizzy. Most of the time, a curling iron can smooth it out, but the fiber will lose a certain amount of body and resilience after having been heat-frizzed. If a little extra care is taken with your wig, you will extend the life of your wig and it will look nice for a long time. Use a Blow Dryers A blow dryer on HIGH setting may be used on HUMAN HAIR wigs, but using a blow dryer on SYNTHETIC fiber wigs tends to remove the curl and body. Remember, synthetic hair wigs are just very fine, plastic fibers and, depending on the quality of the fiber, they may be damaged by heat. If you wish to remove some of the curl from synthetics, a blow dryer will do the trick, but the fiber must be set again to achieve some body. Some Tips Don't use expensive curling irons with settings. Even on the lowest setting, these irons are too hot for synthetic fiber. Go to a beauty supply store and buy the most inexpensive iron they carry which has a HIGH/LOW setting. You may also use hot rollers or a steam setter to set your wig. Properly Use of Curling Iron on to Synthetic Wig Fiber. Mist the hair with a little plain water. Take a small strand of hair between clamp of curling iron and roll around barrel of iron. Keep hair moving around barrel, rolling evenly until all of strand has passed firmly under clamp. Don't rest iron on base of wig, as it will create a roller mark. A slight steaming action will not harm fiber. After curl is formed (not dry), remove the iron carefully, leaving the curl intact and being careful not to drag the ends out of the curl, as this will make the curl uneven. If a looser curl is desired, work the hair with fingers while still warm. If a firmer curl is desired, let dry before combing. Note: We do recommend washing and conditioning your new wig before wearing it. It has been handled by workers in the manufacturing process, and treated with a mildew retardant before leaving the factory. Guide for First Time Wearers? * The brand-name tag goes in the back. * Grasp the wig at the back bottom with both hands, and position the front firmly at your forehead. Then pull the whole cap back and down so that it covers your head. The wig should not cover your ears. * There are two little tabs at the ears and they should be positioned so that they are equal on both sides in front of your ears. This will let you know that your wig is on straight. * Most wigs today have a small wire stay sewn inside the ear tabs. These should be bent a little and curved in toward your head. This will give you a more custom fit at the temples. The front of the wig should be positioned right at the hairline. * If you do not have hair, place your first three fingers together just above your brow bone and where the top edge of your index finger is should approximate your natural hairline. There are adjustment straps in the back of your wig. They may be used to tighten or loosen the wig for a comfortable fit. Care and Styling Wigs Although the hair used in making human hair wigs is grown on a human head; it isn't like the hair growing out of your own head. After harvesting, it is chemically processed to remove the cuticle in order to minimize tangling, which can be a real nuisance with virgin hair. In addition, most of the hair is bleached out and dyed back for uniformity of color, then the hair is mixed and blended into whatever colors the company requires. So the hair has already gone through a triple chemical processing before it becomes a wig. For this reason, only shampoos, conditioners, sprays, and other styling products formulated especially for processed hair should be used. Oil-based products, like the ones we use on our hair, can coat processed hair and make it appear dull and lifeless. We carry a full line of products made especially for wig care. They may be found in our wig accessories section. Pre-Designed Wigs, Pre-Made and Stock Items There are many choices today in wigs that are PRE-MADE, and chances are that there is one that will work for you. PRE-MADE or PRE-DESIGNED pieces are units, which can be shipped immediately from the wholesalers. They are also called STOCK wigs, because they are wigs that the company keeps in stock, and are generally the styles and colors, which are available in their catalogs. Many can be customized with cut, style, size, perm and color. The Three Basic Types of Wigs A RAW wig (can be human hair or synthetic), is one, which comes from the factory with hair that has a basic length but without shaping. It must be cut, shaped, perm if necessary, and styled by a wig professional to look natural. RAW wigs are the most versatile of all wigs, as the talent and imagination of the stylist only limit them. An Un-style wig is one which has been cut and possibly shaped at the factory, and may have been curled or perm as well, but requires professional attention to make it wearable for the average person. Most of them contain more hair than the average wig, which makes them more versatile, but also makes the initial styling more difficult. Unless you have an experienced wig professional available in your local area to do it for you, we recommend that you purchase these wigs from us styled only. A Pre-Styled wig is one, which has been cut, shaped and curled at the factory. It is then folded up and packed in a little box or bag with a hair net around it for shipping to the wholesalers. This is the way most mail-order wig companies ship their products to you. They are the easiest wigs for the customer to handle right out of the box. They may require some combing and arranging of the hair, or fingerpicking, scrunching and/or moussing for the finished style. Pre-Styled wigs are generally synthetic, although occasionally a company may offer Pre-Styled human hair wigs. A Pre-Styled human hair wig will already be cut, shaped and perm if the style requires it, but may need some final touches to make it wearable. A human hairstyle will only last until the wig is washed. The cut and perm will still be there, but the human hair wig will have to be set in rollers or blow-dried and curled with an iron to get the style back.  |
|
| How to measure your head | |
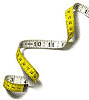 Here are 3 simple steps to measure your head correctly: Here are 3 simple steps to measure your head correctly: Before you measure, make sure to flatten your hair, use a cloth tape measure and do not pull the tape measure, just rest it over or around your head. Pulling stretches the tape and will give you the wrong size. 1. Measure around your head at the hairline. The "around your head" size of every wig can be adjusted up to 1" larger or smaller to ensure a secure fit. The tape should be just above the ear and along your natural hairline. 2. Measure your head from the nape over the crown to the top of your foreheadwhere your natural hairline is. 3. Measure your head from the top of one ear, across the top of the head (crown) and to the top of the other ear. With the 3 measurements listed above, you will have the circumference, the depth and width of your wig cap. Choose the correct size from chart below: 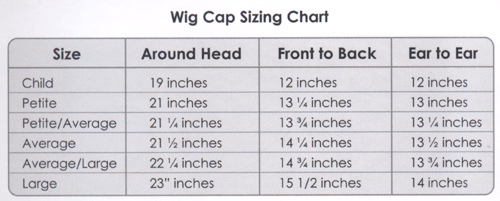 Topics and arts are supported by Jon Renau wigs. |
|
| How to put it on wig | |
First secure your own hair by pinning or using a wig cap. Hold wig by back (where the tags are) and shake if it's fresh from the box. Loosen the Velcro straps or hooks in the back of the wig. You can re-size later. Grasp the wig by the sides and slip it over your head. Adjust until the wig looks like your own hairline at the front. Four (4) simple steps to put it on wig:  Step1: Remove the hair net and hold wig at the front hairline and gently shake to separate the fibers.  Step 2: Spray your new wig with wig lusterizer  Step 3: Secure your own hair by pinning or using a Wig Cap or Liner.  Step 4: Hold your wig by its sides and slip it over your head. Adjust until the wig looks like your own hairline at the front. The sides will be a close fit and the entire head shape will look natural. Each wig can be adjusted for your particular head size. Styling Hints: Styling is very easy with either your fingertips or wig brush. Do not use heat. With towel lay your wig on a flat surface to dry naturally. Our wigs are so designed that ease of handling and styling is one of their most important features. Height can be achieved by gently lifting with the brush. Your wig can be styled closer to the head for a flatter look. If added fullness is required, backcomb gently then smooth the surface hair over the backcombing. Topics and arts are supported by Jon Renau wigs. |
|
| Standard Color Chart | |
|
STANDARD COLOR CHART (For African Americans)* HUMAN HAIR COLORS 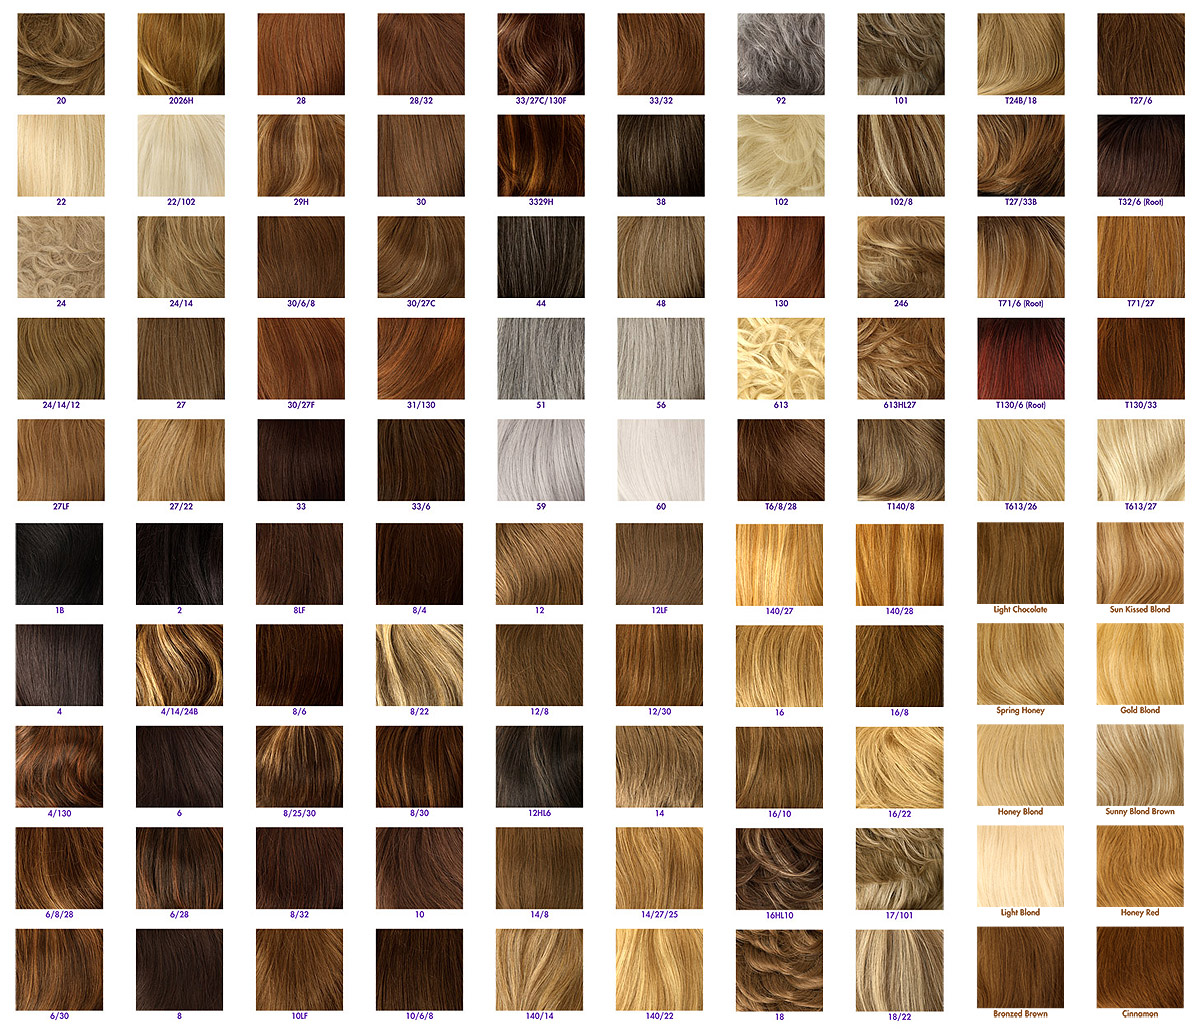 SYNTHETIC HAIR COLORS 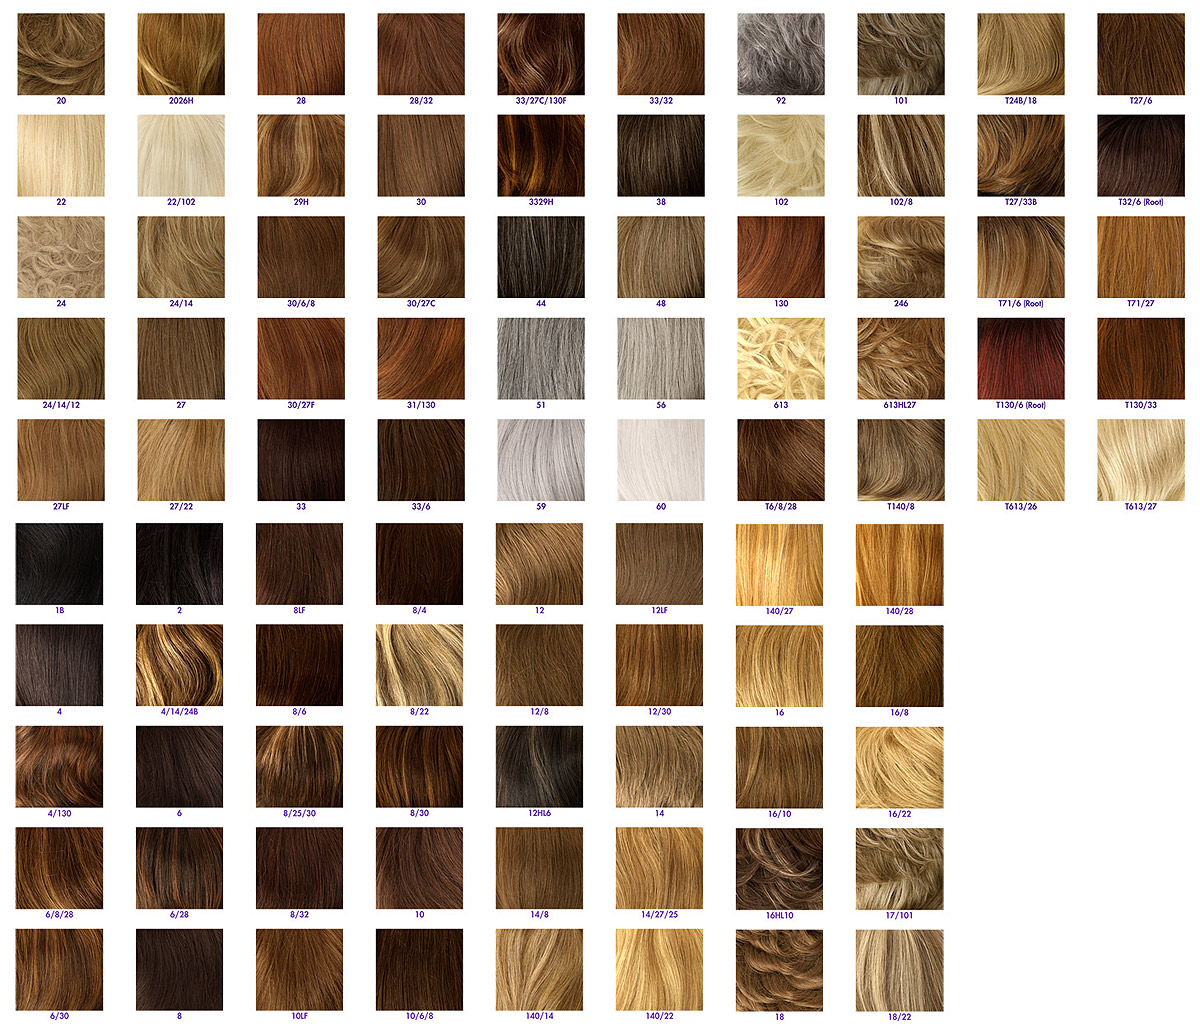 *Actual Color Mixtures are Vary by Brands or Hair Texture. Use for representative only. |
|